XSD Tools
Version: 2.1.0
Note: The standalone XSD Editor tab has been retired. XSD editing — the Text/Tree/Graphic views, the inspector, the Type Library, type editing, documentation generation, schema flattening and schema analysis — now lives in the Unified Shell (open an
.xsdfile; "go to schema definition" from the XML editor opens the schema's graphic view at the element). The capabilities below are unchanged; they are reached through the shell rather than a dedicated sidebar tab.
This part of the application provides tools for working with XML Schemas (XSD). These tools help you understand, document, and use XSD files effectively.
Overview
When you open an .xsd file in the Unified Shell, the editor host and the
Schema activity provide several capabilities, each with a specific purpose:
| Capability | Description |
|---|---|
| Graphic View | Visual schema editor with interactive tree |
| Type Library | Browse and analyze all types in your schema |
| Type Editor | Edit ComplexTypes and SimpleTypes graphically |
| Text View | Raw XSD source code editor |
| Schema Analysis | Statistics, type library with unused-component cleanup, quality checks, identity constraints and XPath validation - exportable as CSV / JSON / HTML / PDF / Excel |
| Documentation | Generate HTML, Word, or PDF documentation |
| Preview | The editor's Preview view renders HTML files, e.g. generated documentation opened in the shell |
| Generate Example Data | Create sample XML from schema with customizable rules and profiles |
| Flatten Schema | Merge includes into one standalone file, with optional reduction for server-side validation |
1. Graphic View
The Graphic View lets you explore and edit your schemas visually.
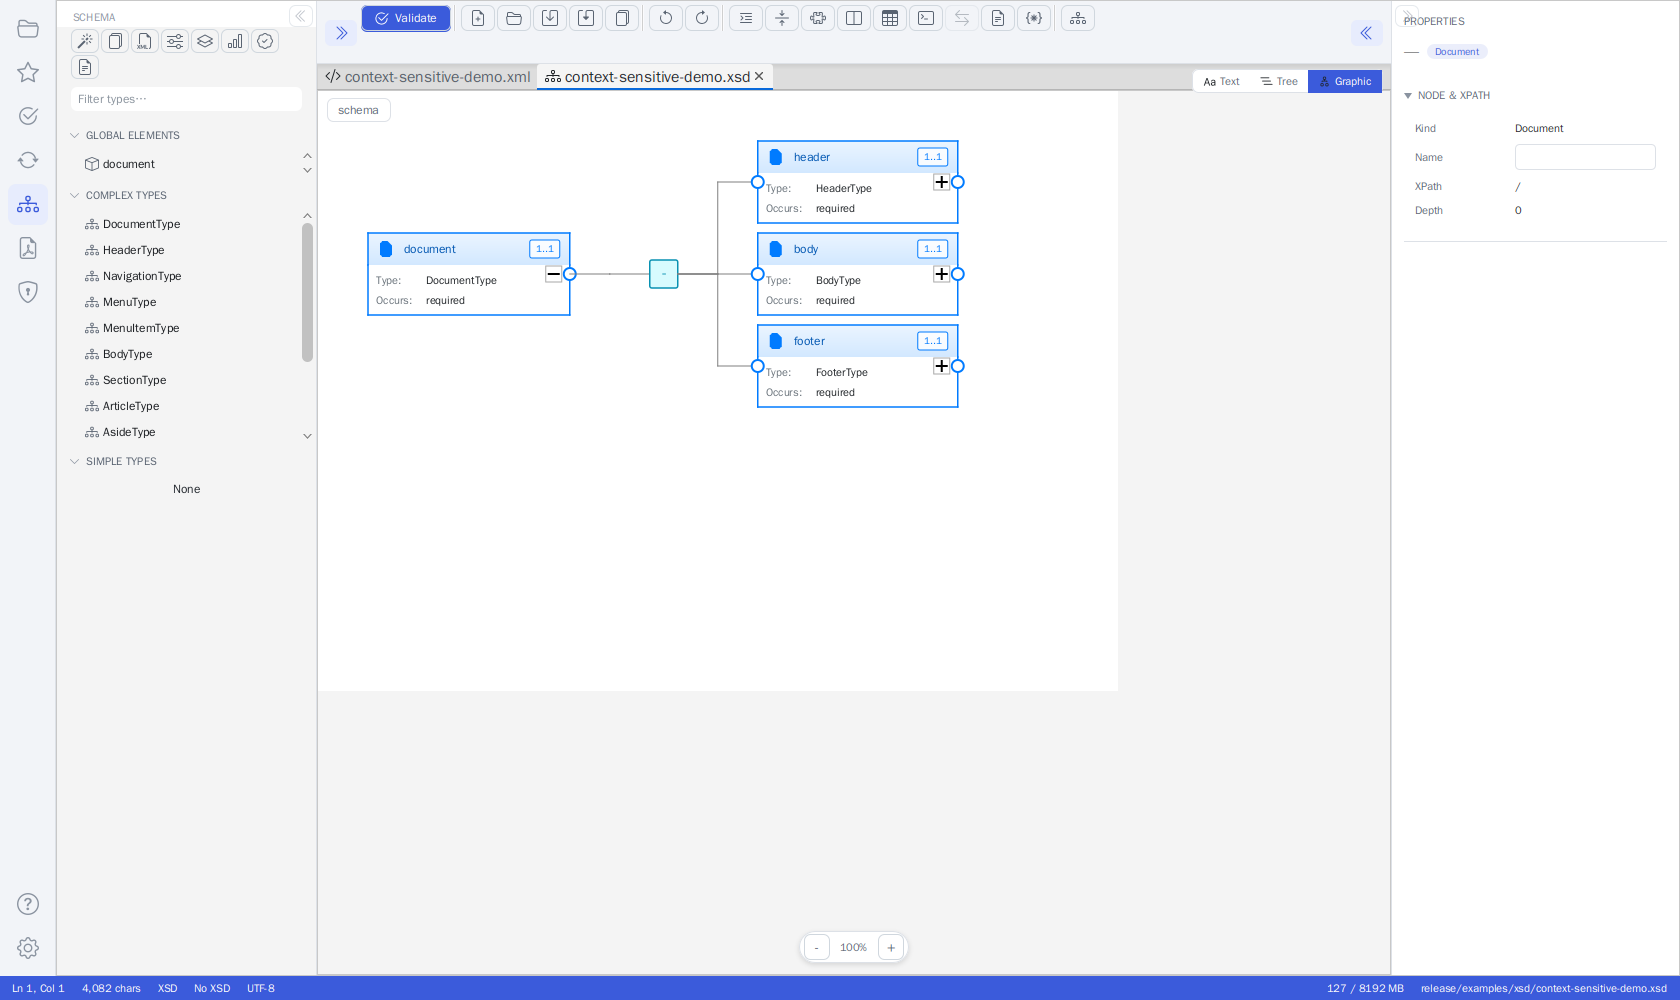 An XSD open in the Unified Shell's Graphic view, with the Schema activity panel on the left
Features
- Visual Tree: See your XSD as an interactive, hierarchical tree
- Easy Navigation: Click on elements to explore their structure
- Edit Documentation: Add or edit documentation for schema elements using the inline tab-based editor (no modal dialogs)
- Add Examples: Include example values for elements
- Reorder and Duplicate: Move nodes up and down, copy, cut, paste and duplicate them from the context menu
- Full Undo/Redo: Go back and forward through your changes
How to Use
- Open your XSD file in the editor host and switch to the Graphic view
- The schema appears as an interactive tree
- Select an element by clicking on it
- Edit properties in the panel on the right (name, type, cardinality/occurrence, use, form, constraints, documentation, and facets)
- Add children using the context menu (right-click)
- Reorder nodes with Move Up / Move Down from the context menu; Delete removes the selected node
Editing properties from any view: The same Properties pane is available in the Text view as well as the Graphic and Tree views. See Editing Schema Properties from Any View below.
Tips
- Right-click for a context menu with common actions (Rename…, Change Type…, Change Cardinality…, add/move/delete)
- Edit the name and every other property in the Properties pane on the right
- Ctrl+Z to undo, Ctrl+Y to redo
- Ctrl+S to save (a backup is created automatically - Settings → XSD lets you turn this off or change the number of kept versions, 3 by default)
- The toolbar's Save ▾ split button saves the schema; its arrow menu offers Save As… (Ctrl+Shift+S, save under a new name) and Save All (saves every open tab)
Automatic Resolution of Imported Schemas
Some schemas import other schemas that are not shipped alongside them. For example, many financial schemas contain:
<xs:import namespace="http://www.w3.org/2000/09/xmldsig#"
           schemaLocation="xmldsig-core-schema.xsd"/>
If xmldsig-core-schema.xsd is not next to your schema, FreeXmlToolkit resolves the
import automatically, trying these sources in order:
- Next to the declaring file - a relative
schemaLocationis resolved against the folder of the schema that declares the import (also for imports declared inside an imported or included file). - The Schema Library - your own mappings, registered XML catalogs and the bundled standards, matched by the declared location (system ID) first and then by the import's namespace. A hit here loads without any network access.
- The schema cache - a previously downloaded copy under
~/.freeXmlToolkit/cache/schemas/, again without network access. - The declared URL - an
http(s)schemaLocationis downloaded (following redirects, using your proxy settings). - The namespace URL - as a last resort the schema is fetched from the import's namespace URL, which is how the W3C hosts the XML signature schema, for instance.
Downloaded content is verified to be a real XML Schema, then stored in the cache so future
loads work offline. Imports are resolved transitively: an imported schema's own
xs:import and xs:include declarations (and imports declared inside an included file)
are followed too, with circular imports detected and a nesting depth cap of 10.
A few things to know:
- Your files are never touched. Resolved and downloaded schemas go to the shared cache only - nothing is written into your schema's folder, and the schema itself is never rewritten. This applies everywhere imports are resolved: the schema views, validation, the Type Library, Schema Analysis and documentation generation.
- Only imports whose namespace is an
http://orhttps://URL are looked up by namespace (step 5). xs:includereferences are resolved relative to the including file, or through an XML catalog / Schema Library entry for their location - they are not looked up by namespace.- Internal and private network addresses are never contacted - see Security Features.
- Clearing the cache (Settings → Temp & Cache, or the Schema Library's Cache tab) is safe: missing schemas are simply re-downloaded the next time they are needed.
- Advanced: to turn remote downloads off entirely (for example in fully offline
environments), start the application with the system property
-Dfxt.schema.namespaceFallback=false- local files, catalog hits and already-cached copies still resolve.
2. Type Library
The Schema activity's side panel is your type library: it lists the active schema's top-level declarations so you can browse, find, and open every type in the schema.
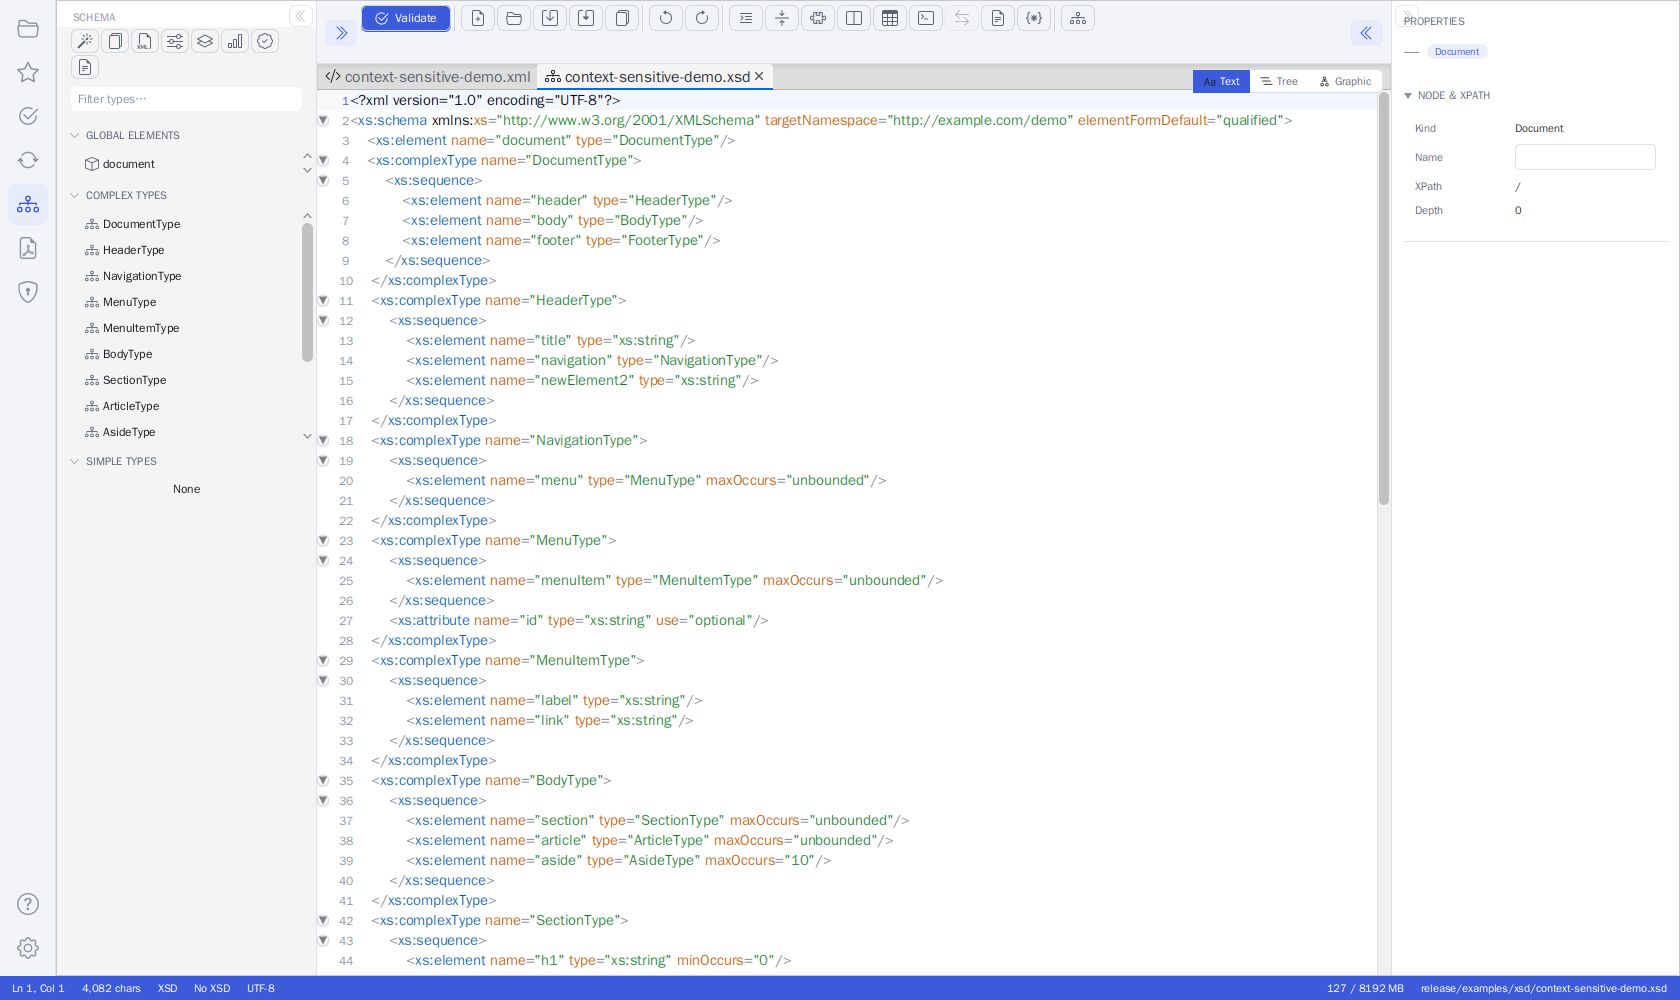 The Schema activity's Type Library, with the schema diagram in the editor host
Features
| Feature | Description |
|---|---|
| Grouped lists | Declarations grouped into GLOBAL ELEMENTS, COMPLEX TYPES, and SIMPLE TYPES (collapsible sections) |
| Filter | A filter field on top narrows all three lists by name as you type |
| Reveal in Tree | Click a declaration to reveal it in the schema's Tree view |
| Open Type Editor | Double-click a type to open it in its own Type Editor tab |
| Find Usage | Right-click a type to find the places where it is used |
| Schema tools | Labelled rows in the collapsible TOOLS section above the filter: Generate XSD from XML (single/batch), Generate Sample XML (plain/advanced), Flatten Schema, Schema Analysis, and Generate Documentation |
How to Use
- Open your XSD file
- Open the Schema activity from the activity bar
- Browse the grouped lists, or type in the filter field to narrow them
- Click a declaration to reveal it in the Tree view
- Double-click a type - or right-click and choose Open Type Editor - to edit it; right-click also offers Reveal in Tree and Find Usage
Tip
The whole panel is a drop zone: drop an .xsd file from your file manager anywhere on
it to open that schema as a document.
3. Type Editor
The Type Editor provides dedicated editing for ComplexTypes and SimpleTypes.
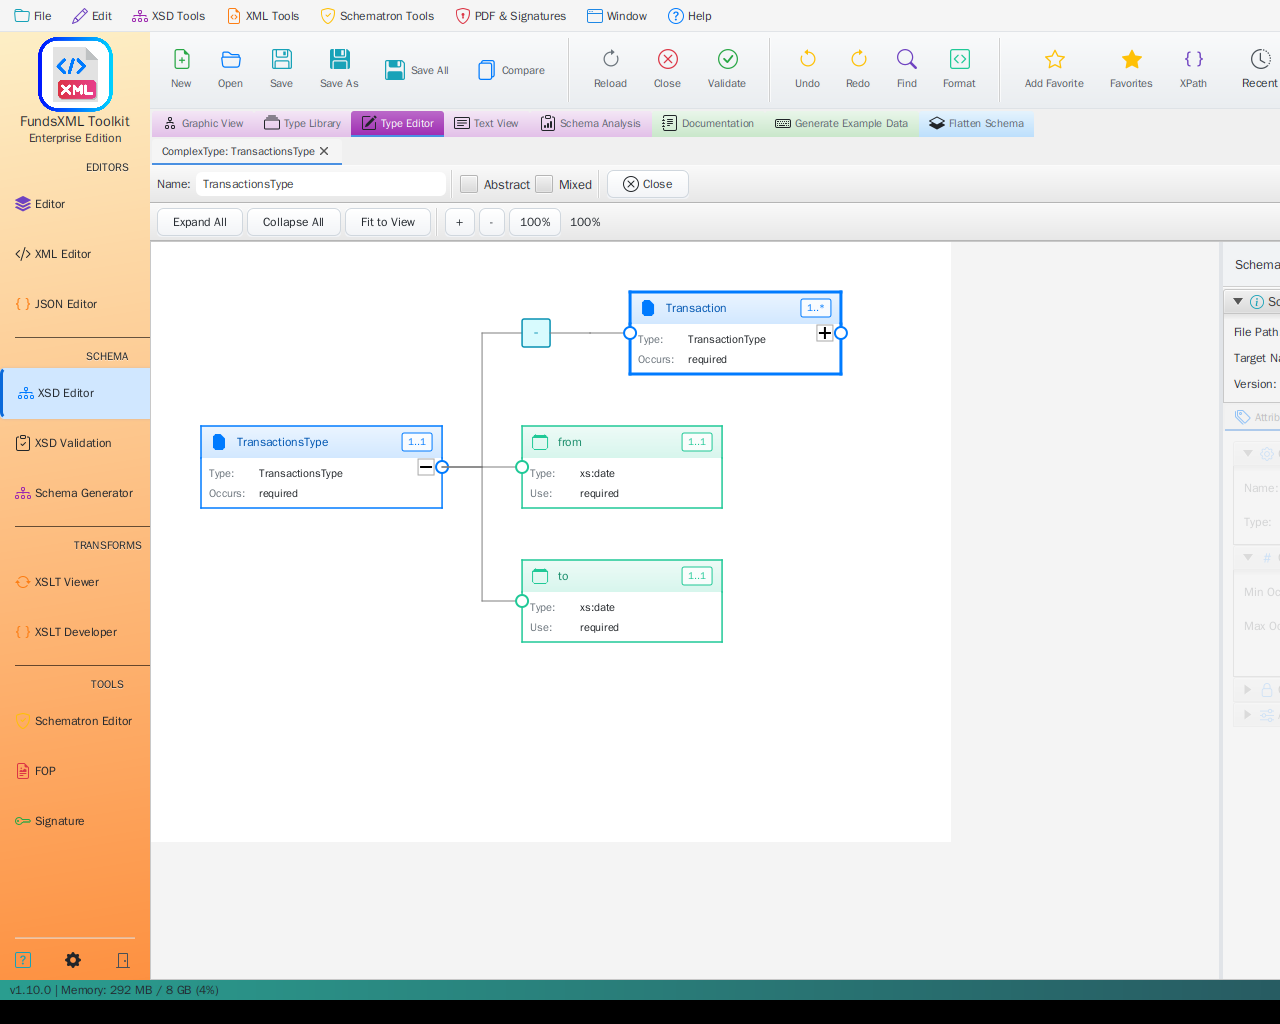 A named type opened in its own Type Editor tab in the editor area
Features
| Feature | Description |
|---|---|
| Tab-Based Editing | Each type opens in its own tab in the editor area |
| ComplexType Editor | Graphical editing with element tree |
| SimpleType Editor | Form-based editing with facet panels |
ComplexType Editor
For ComplexTypes, you get a graphical editor similar to the main schema view:
- Type name appears as the root node
- Add, delete, modify elements graphically
- Supports Sequence, Choice, and All compositors
- Save/Discard with dirty tracking
SimpleType Editor
For SimpleTypes, you get a 5-panel form editor:
| Panel | Description |
|---|---|
| General | Name and Final attribute |
| Restriction | Base type and facets |
| List | ItemType selection |
| Union | MemberTypes management |
| Annotation | Documentation and AppInfo |
How to Use
- In the Schema panel's Type Library, find the type (use the filter field for large schemas)
- Double-click it - or right-click and choose Open Type Editor. Alternatively, pick Type Editor… from the editor toolbar's Schema ▾ menu and choose a type by name.
- The type opens in its own Type Editor tab in the editor area
- Make your changes
- Click Save or use Ctrl+S
4. Text View
The Text View provides raw XSD source code editing.
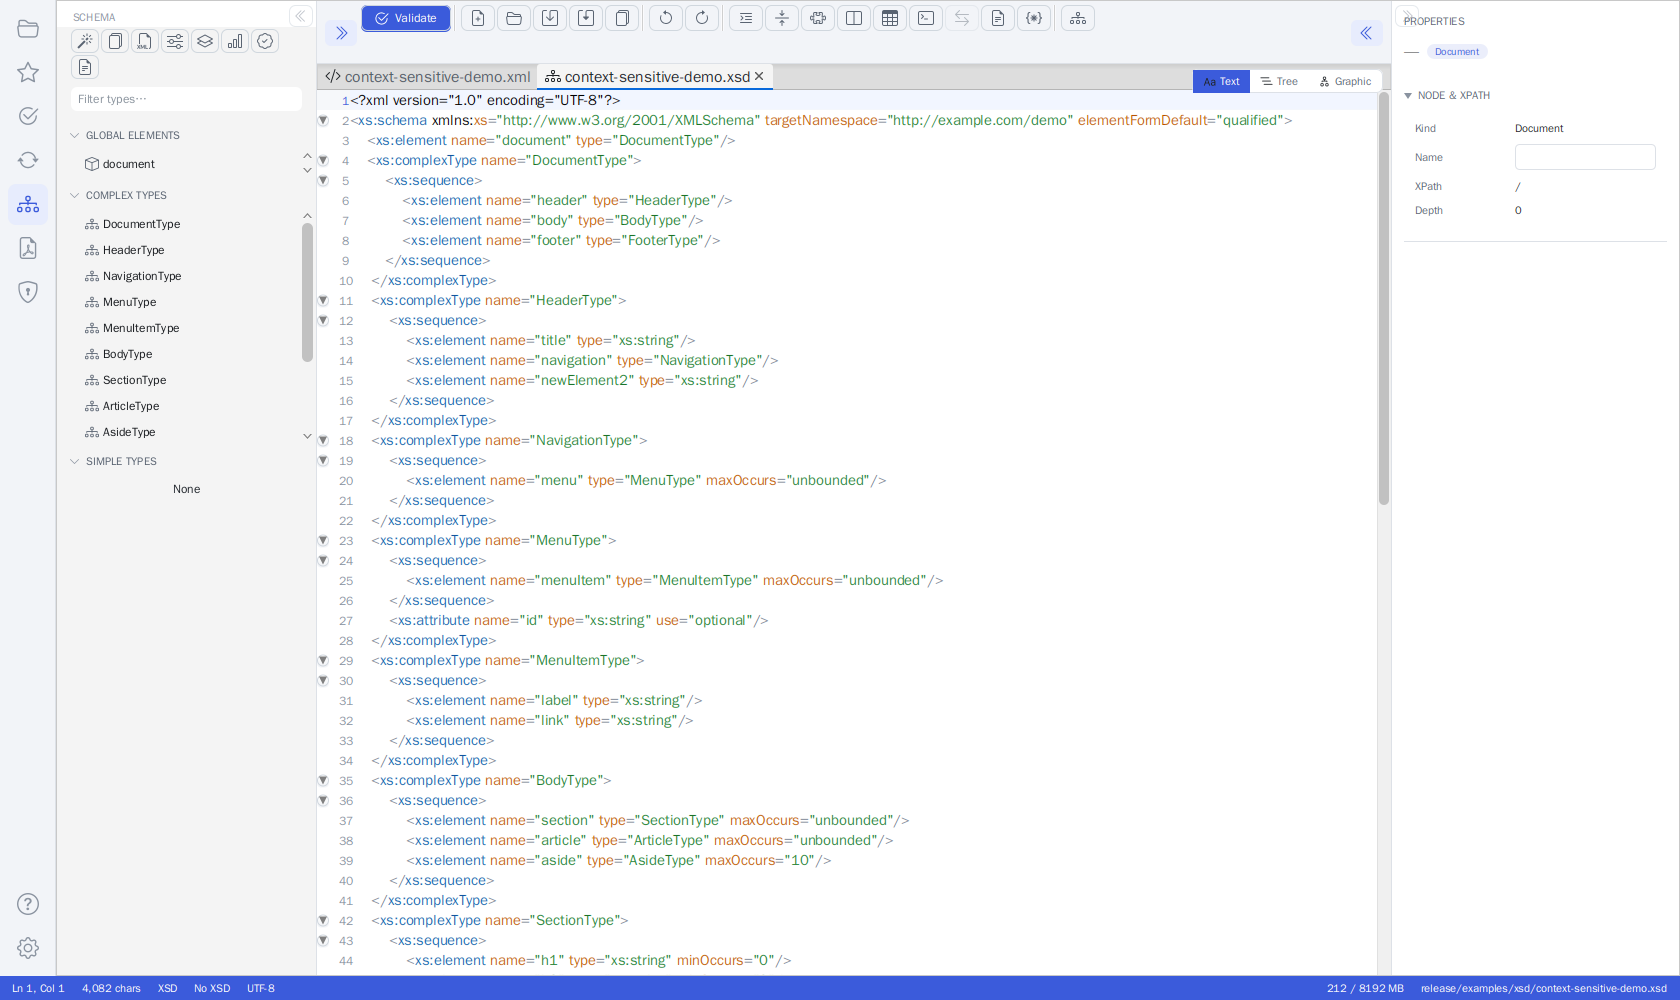 The XSD in the Unified Shell's Text view (Schema activity panel on the left, inspector on the right)
Features
- Full Code Editor: View and edit the raw XSD source code
- Syntax Highlighting: Color-coded code for easy reading
- Search and Replace: Find and change text quickly
- Query Console: Query the schema with XPath/XQuery (Ctrl+Shift+X)
- Save as Favorite: Quick access to frequently used schemas
- Editable Properties pane: Move the text caret into a schema construct to select it and edit its properties without leaving the text editor (see below)
Editing Schema Properties from Any View
You can edit a schema node's properties directly from the Text view, the same way as in the Tree and Graphic views.
The XSD editor has three views - Text, Tree, and Graphic - and all three share one in-memory schema model. The Properties pane works in every view:
- Tree and Graphic views: Select a node to edit its name, type, cardinality/occurrence, use, form, constraints, documentation, and facets.
- Text view: Move the text caret into an XSD construct - such as an
xs:element,xs:complexType,xs:simpleType,xs:attribute, a compositor (xs:sequence,xs:choice,xs:all), or a facet - and the Properties pane selects the matching schema node and shows it editable. You get the same property editing as in the Tree and Graphic views, without leaving the source editor. Your edits round-trip back into the schema text as a minimal change that preserves your caret and scroll position.
If the caret is not inside a recognizable construct - for example inside an xs:annotation, a
comment, or blank space - the pane falls back to a read-only caret/XPath view.
Because all three views share one model, your edits and your Undo/Redo history are preserved when you switch between Text, Tree, and Graphic.
What You Can Edit in the Properties Pane
For the selected schema node you can edit:
- Name, type, cardinality/occurrence, use, form - The core properties of the node.
- Facets - Add, edit, and remove facets such as patterns, enumerations, and length limits.
- App info (
xs:appinfo) - The machine-readable metadata attached to the node (for example the technical tags described in Documentation Generator). - Multi-language documentation (
xs:documentation) - One row per language. Use Add language to add a translation and the ✕ button to remove one. - Comments - Select an XSD comment in the tree to edit its text. To add a comment, choose Add Comment… from a node's right-click context menu.
- Constraints - In the CONSTRAINTS section, select a
key,keyref,unique, orassertconstraint and click Delete constraint to remove it.
Note: Structural editing (adding, deleting, and moving nodes) remains a Tree and Graphic capability via the right-click context menu. The Text view provides property editing through the Properties pane.
5. Schema Analysis
The Schema Analysis row in the Schema panel's TOOLS section analyzes the active XSD and opens the report as a tool tab in the editor area. The analysis runs in the background on the current editor text (unsaved changes included); imports and includes are resolved relative to the file. The header shows the document, the quality score, the number of issues, the number of unused types and - when unused components drag further components along - the size of the unreachable set; Refresh re-runs the analysis, and opening the tool again while the tab is already open re-analyzes the active document instead of adding a second tab.
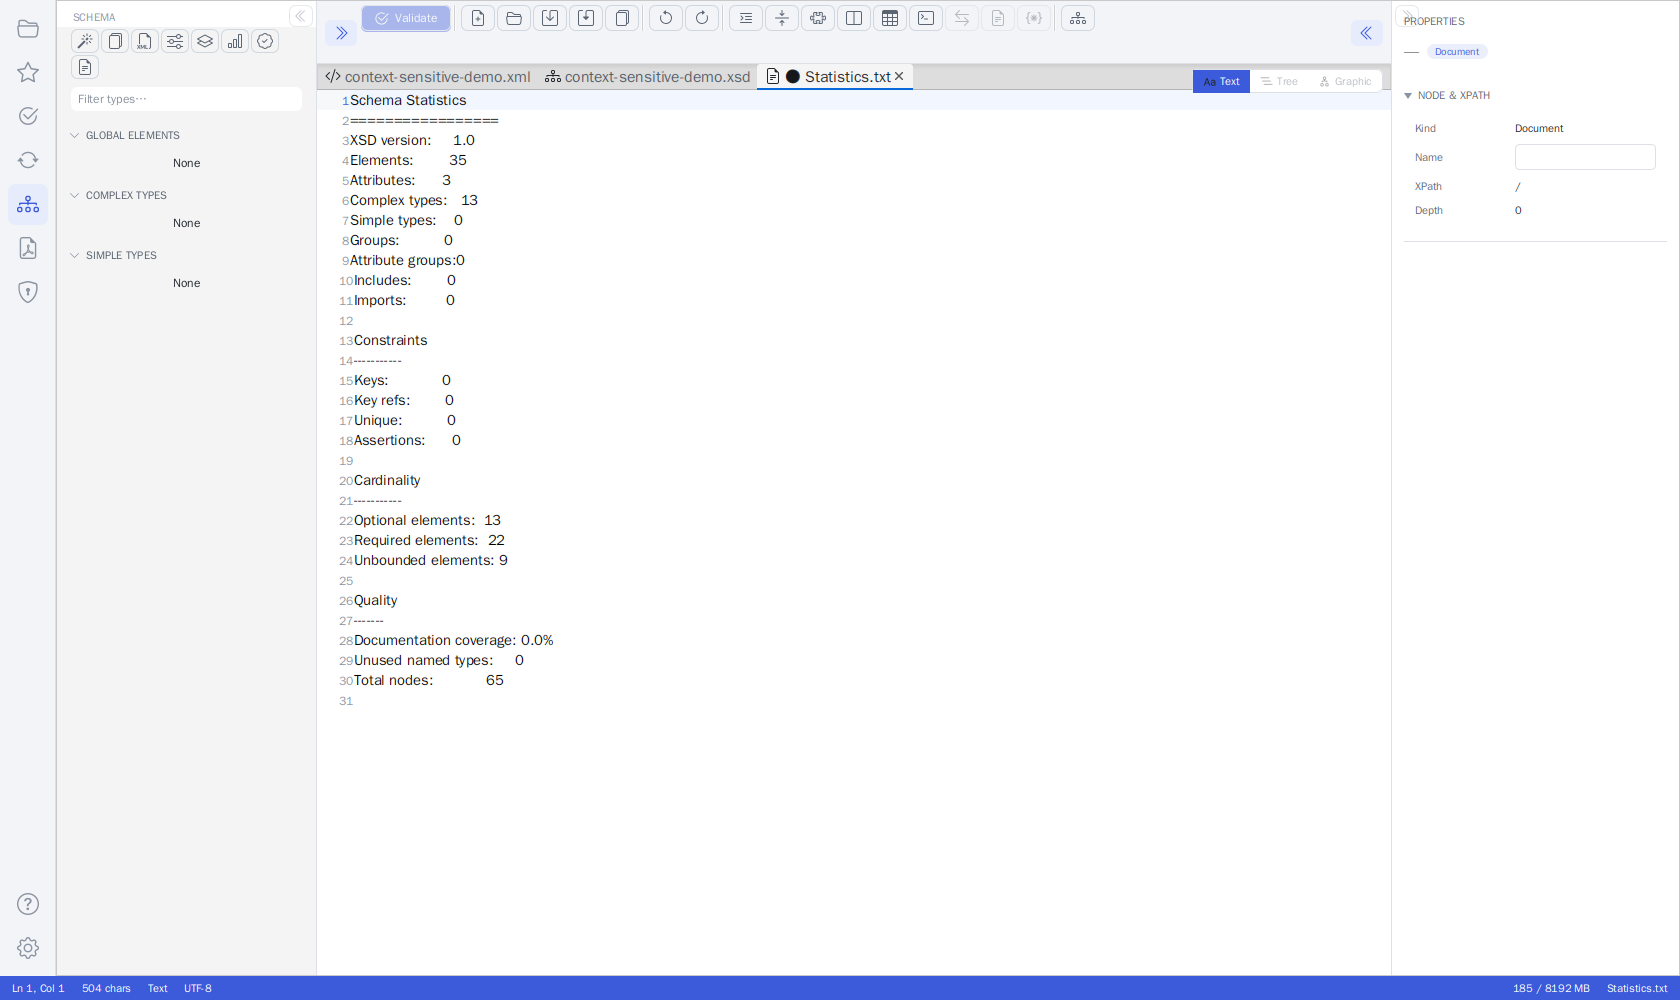 The Schema Analysis tool tab with its five sub-tabs, opened from the Schema activity
Every finding is a link into the schema: selecting a row, an unused type, a usage location or an affected element switches the document to the Tree view and reveals the node.
Export in the header writes the complete report - every section of every sub-tab - as
CSV, JSON, HTML, PDF, or Excel. Each sub-tab additionally has its own Export menu that
writes just that section in the same formats. All formats carry the same content: CSV as one
block per section (facts as Key,Value, then each table), JSON as sections keyed by id with
tables as arrays of objects, HTML with a table of contents, PDF with one chapter per section,
and Excel with one sheet per section.
Statistics
The Statistics tab opens with a row of tiles for the declaration counts (elements, attributes, complex and simple types, groups, attribute groups), followed by detail cards:
| Card | Metrics |
|---|---|
| Schema | XSD version (1.0/1.1), target namespace, form defaults, namespaces, total nodes |
| Files | Schema files, includes / imports, unresolved references, and node counts per file for multi-file schemas |
| Constraints | Counts of xs:key, xs:keyref, xs:unique, and assertions |
| Documentation | Coverage bar (green ≥ 75 %, yellow ≥ 40 %, red below), documented nodes, appinfo nodes, documentation languages, the most frequent appinfo tags (@deprecated, @since, …) |
| Cardinality | Optional vs. required elements as a two-segment bar, plus the unbounded element count |
| Complexity | Deepest element nesting (hover for the XPath), longest type-derivation chain, widest complex type, average declarations per type, abstract types / elements, substitution-group heads / members, anonymous types, mixed content, extensions / restrictions, XSD 1.1 features |
| Facets | Total facets and enumeration values, plus a count per facet kind (pattern, maxLength, …) |
Below the cards:
| Section | Content |
|---|---|
| Schema references | One row per xs:include / xs:import with its location, resolution status (error in the tooltip), namespace and the number of elements, types and groups it contributes; shown only for multi-file schemas |
| Most used types | The named types with the most references; the usage bar is relative to the most used type |
| Unused types | Every named type that is never referenced, listed by name - click one to reveal it |
| Unused groups / attribute groups | Global xs:groups and xs:attributeGroups nothing references |
| Circular references | Type-derivation cycles (a type deriving from itself - an error) and recursive content models (Folder → FolderType → Folder, legal); click one to reveal its first member |
Types
The Types tab is the type library of the schema: one row per global complex type, simple
type, group and attribute group with its kind, name, base (extends X, restricts X,
list of X, union of A, B), first documentation line, usage count and - for multi-file
schemas - the include file it comes from. The usage chip is red for 0 usages, orange for
one to three, green otherwise. The chips above the table filter by kind, Unused (never
referenced), Unreachable (not reachable from any global element or attribute, directly or
through other components - the cascading unused set) and Single use (named types used
exactly once, candidates for an inline anonymous type); the text field searches name, base and
documentation.
Selecting a row reveals the component in the Tree view and fills the Used in list with
every reference to it (element and attribute types, base types, list item and union member
types, refs, substitutionGroups - references from included files are marked with the file
name, references from imported schemas with [import]); selecting a usage reveals the
referring node. The Documentation box shows the full documentation text.
Remove unused (N)… deletes every unreachable component of the analyzed document in one step: a confirmation lists what will be removed; components declared in included files are skipped (they belong to another file). The deletion goes through the editor's command stack, so Ctrl+Z in the document restores all of them at once, and the analysis re-runs afterwards.
Quality Checks
The Quality Checks tab shows a score (0-100) with its rating, the number of checks passed, the dominant naming convention and its distribution (chips per convention, the dominant one in green), and the issues found. The count chips next to the score (by severity and by category) are clickable filters - click one to show only those issues, click it again to clear. The filter bar offers the same severity and category selection plus a free-text search and reports how many issues are currently shown. Every row carries a severity icon; the File column names the include file of a finding (full path in the tooltip) and the location column shows the XPath. Select an issue to read its suggestion and location and to jump to the affected elements.
| Check | Severity | Description |
|---|---|---|
| Naming Convention | Warning | Element, attribute, type and group names that deviate from the schema's dominant convention (UpperCamelCase, lowerCamelCase, snake_case, kebab-case) |
| Best Practice | Info / Warning / Suggestion | xs:any / xs:anyAttribute wildcards and unbounded content without limits (info), elements nested deeper than the Max nesting limit (warning), anonymous complex types (suggestion) |
| Deprecated | Warning | Components marked as deprecated in xs:appinfo |
| Constraint Conflict | Error | Enumeration values that conflict with length facets |
| Inconsistent Definition | Warning | The same name defined with different content in several places |
| Duplicate Definition | Info | Different names with identical structure |
| Duplicate Element in Container | Error | The same element declared twice in one sequence, choice, or all (ambiguity error) |
| Unresolved Reference | Error | A type, ref, base, itemType, memberTypes, substitutionGroup or XSD 1.1 alternative type naming a component that is declared nowhere (XSD built-ins, prefixes bound to other namespaces and unknown prefixes are ignored) |
| Circular Reference | Error / Info | A type deriving from itself, directly or indirectly (error); a recursive content model (info) |
| Unused Component | Info | A named type, group or attribute group that nothing references, or that is only referenced from other unused components |
| Missing Documentation | Suggestion | A global component without xs:documentation |
| Inline Candidate | Suggestion | A named type used exactly once as an element or attribute type - could be declared inline (abstract types and types from included files are not suggested) |
Max nesting (top right of the tab, default 5) is the limit of the deep-nesting check: it counts element levels declared inside one another through anonymous types - compositors and the types themselves do not count, and an element with a named type starts a new declaration. Changing the value re-runs the analysis; the setting is remembered.
The score is the share of checked declarations (every named element, attribute, type and group) that no Error or Warning counts against: a naming deviation or a too deeply nested element costs one declaration, a duplicate element every occurrence, and an inconsistent definition the declarations that deviate from the most frequent variant of that name. The informational checks (unused components, recursion, missing documentation, inline candidates) never lower it; documentation coverage has its own percentage on the Statistics tab.
Identity Constraints
The Identity Constraints tab lists every xs:key, xs:keyref, xs:unique, and
xs:assert with its parent element, selector, fields, referenced key or test expression, and a
validation status - for example a keyref whose refer points to a key that does not exist.
The count chips above the table filter by kind (key, keyref, unique, assert) and by status
(errors, warnings); click a chip again to clear the filter. Selecting a row reveals the
constraint in the Tree view and fills the details pane with the validation message, the parent
element (a link), selector and fields, and - for a keyref - a link that selects the referenced
key.
XPath Validation
The XPath Validation tab lists every XPath expression used by identity constraints and assertions - each selector, each field and each assert test is one row - with its status: Valid, or the most severe finding for it (syntax errors, element names that do not occur in the schema, empty assert tests). The status chips above the table are clickable filters, and the details pane shows the full expression, the findings and a link to the parent element. The expressions are checked statically against the schema; they are not evaluated against a sample XML document.
Note
Identity constraints (xs:key, xs:keyref, xs:unique, xs:assert) can also be
inspected and deleted per node in the Properties inspector's CONSTRAINTS section -
see What You Can Edit in the Properties Pane.
6. Documentation Generator
Create professional documentation from your XSD file automatically.
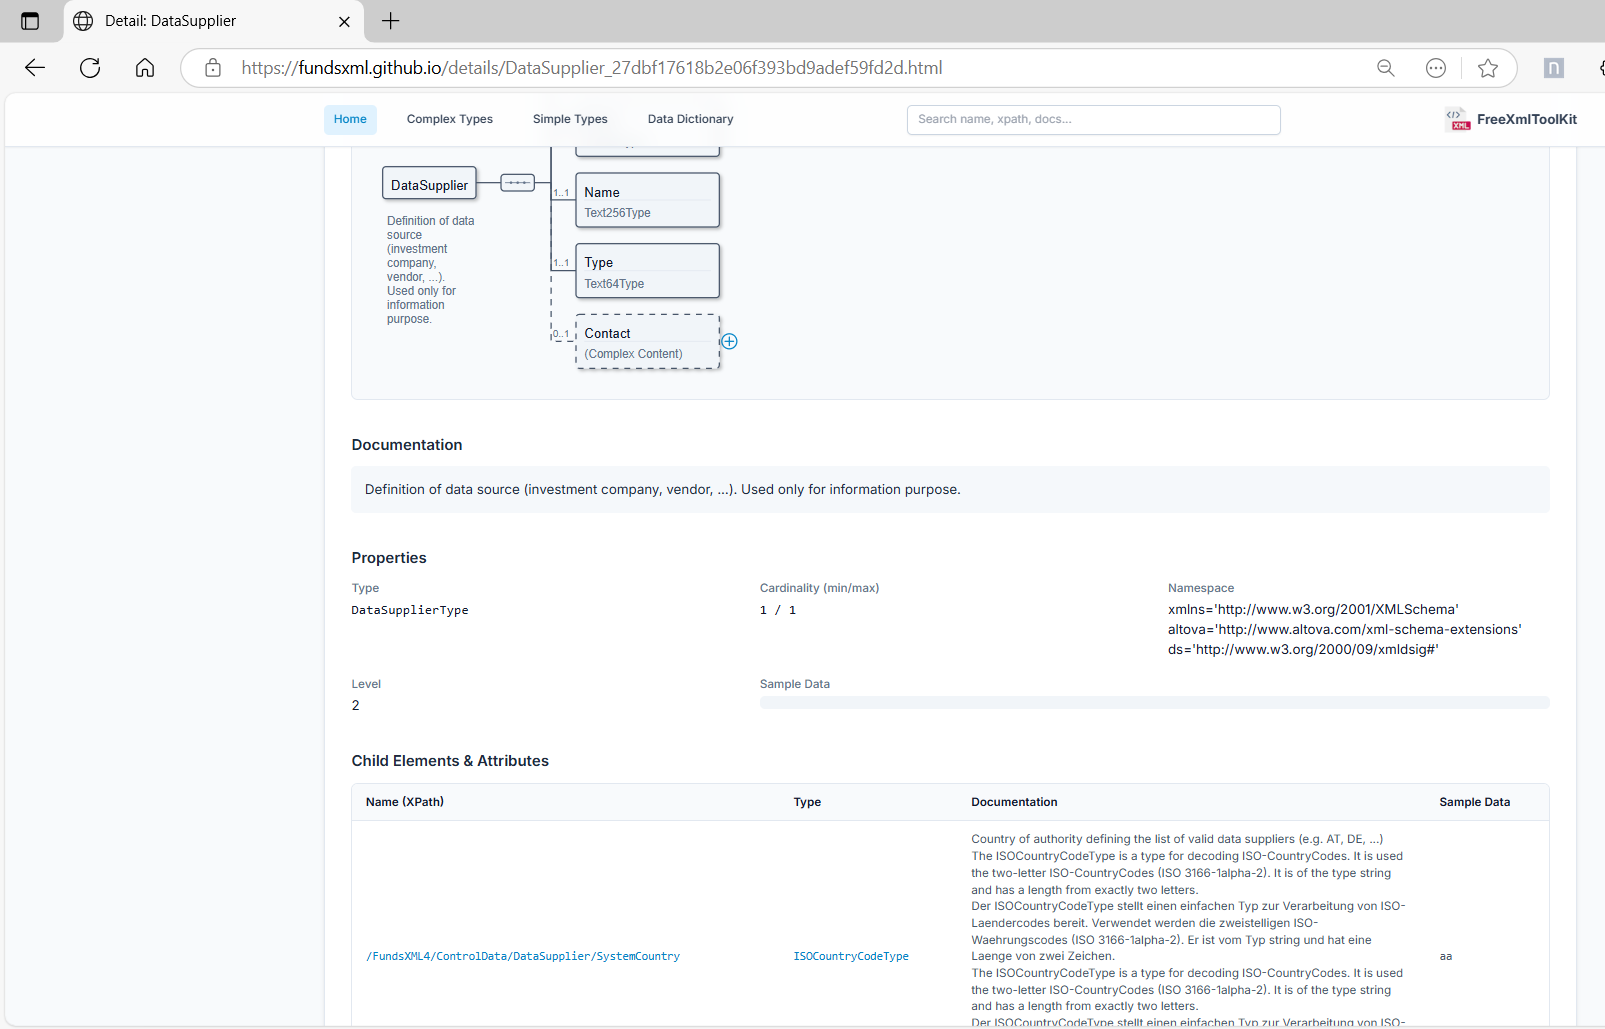 The Documentation generator open as a tab in the editor area, with source, format, and options
Output Formats
| Format | Description |
|---|---|
| HTML | Interactive web documentation with navigation |
| Word | Microsoft Word (.docx) document |
| PDF document using Apache FOP |
How to Generate Documentation
- Open your XSD file in the editor host
- Click Generate Documentation… in the Schema panel's TOOLS section (or pick it from the editor toolbar's Schema ▾ menu) - the generator opens as a tab in the editor area
- Check SOURCE & OUTPUT: the active schema is pre-filled; choose the output folder (HTML) or file (PDF/Word)
- Select your output format (HTML, PDF, or Word) and the diagram format (SVG, PNG, or JPG)
- Configure options (PDF and Word add page-layout and content options)
- Click Generate - the PROGRESS log streams the pipeline's messages live, and the run can be cancelled
- Open the result automatically or from the output location
Tip
Generation works from the schema's last-saved version on disk so that relative
xs:include / xs:import references resolve correctly - save the XSD first to document
your latest edits. Remote imports are resolved through the Schema Library, XML catalogs
and the schema cache (see
Automatic Resolution of Imported Schemas);
the generator never modifies your schema file or writes into its folder.
Generation Options
| Option | Description |
|---|---|
| Markdown rendering | All documentation (default), Per node (@markdown), or Off - see below |
| Include type definitions in source code | Show the type's XSD source on the detail pages |
| Show documentation in diagrams | Print the documentation text inside the SVG element boxes |
| Generate SVG overview page | Interactive full-schema SVG |
| Add metadata in output | Generator name, date and schema information in the output |
| Deduplicate data dictionary by type | List each type once in the Data Dictionary instead of per usage |
| Image format | SVG (default), PNG or JPG for the diagrams |
| Favicon | A custom icon file for the HTML output |
| PDF / Word options | Cover page, table of contents, data dictionary, schema diagram, element diagrams, page numbers, PDF bookmarks |
| Open the generated documentation after creation | Opens index.html (HTML) or the generated file in your system viewer |
Markdown rendering
xs:documentation text can be rendered as Markdown, so **bold**, lists and links show up
formatted on the generated pages. The choice has three settings:
| Setting | Effect |
|---|---|
| All documentation (default) | Every node's documentation is rendered as Markdown, unless that node itself says @markdown is false |
Per node (@markdown) |
Only nodes whose annotation says @markdown is true are rendered - everything else, including nodes that say nothing, stays plain text |
| Off | Nothing is rendered, whatever the nodes say |
A node's own @markdown always beats the chosen setting - only Off is absolute. Where an
element and its type disagree, the element wins; the type's @markdown applies to every element
using it that does not state its own. The same rule drives the complexType, simpleType, attribute
and enumeration documentation on the generated type pages.
Documentation that is not rendered as Markdown appears literally: **bold** stays visible as
typed instead of being formatted. If you want text formatted, write Markdown and leave the
rendering on.
Unrendered text is HTML-escaped everywhere it appears in the generated HTML, so markup written
straight into xs:documentation shows as the tags themselves instead of being applied. The PDF,
Word and Excel outputs are unaffected: they flatten the documentation to plain text and drop the
markup as before.
Formatting is a feature of the HTML output. The PDF, Word and Excel outputs are plain text: the documentation is flattened for them, but paragraphs, list items and headings each keep their own line instead of running together.
The per-node switch lives in the schema itself and is edited in the Inspector's Markdown choice (Not set / Markdown / Plain text):
<xs:element name="Transaction">
    <xs:annotation>
        <xs:documentation>A **single** financial transaction.</xs:documentation>
        <xs:appinfo source="@markdown">true</xs:appinfo>
    </xs:annotation>
</xs:element>
Language Settings
For multi-language schemas, you can:
- Click Scan languages to detect the
xml:langvalues used in the schema - Untick the languages you do not want in the output
- Choose a fallback language for missing translations
De-selected languages are dropped everywhere: element detail pages, type pages, attribute and
enumeration documentation, the Data Dictionary (HTML and Excel), the search index, the SVG
diagrams and the Source Code snippets on the detail pages. Documentation without an xml:lang
attribute ("default") is always kept as a fallback. The schema files copied next to the
documentation are left untouched. Leaving every language ticked (or not scanning at all) includes
all of them.
Adding Technical Notes to Your Schema
You can add structured technical information directly in your XSD files:
The tag goes into the source attribute of an xs:appinfo, its value into the element's text
content.
Supported tags:
@since- When a feature was introduced@version- Version detail of the component@see- References to other elements (may occur several times)@deprecated- Mark elements as deprecated@markdown-true/false, whether this node's documentation is rendered as Markdown (see Markdown rendering){@link /path/to/element}- Create clickable links inside@seeand@deprecated
Example values are a separate block rather than a tag. They appear as Sample Data on the detail pages and also feed the sample-XML generator and IntelliSense.
Example in your XSD:
<xs:element name="Transaction">
    <xs:annotation>
        <!-- User-friendly documentation -->
        <xs:documentation xml:lang="en">A single financial transaction.</xs:documentation>
        <xs:documentation xml:lang="de">Eine einzelne Transaktion.</xs:documentation>

        <!-- Technical notes for developers -->
        <xs:appinfo source="@since">4.0.0</xs:appinfo>
        <xs:appinfo source="@version">1.2</xs:appinfo>
        <xs:appinfo source="@see">{@link /FundsXML4/ControlData}</xs:appinfo>
        <xs:appinfo source="@deprecated">Use {@link /FundsXML4/NewTransaction} instead.</xs:appinfo>
        <xs:appinfo source="@markdown">true</xs:appinfo>

        <!-- Example values -->
        <xs:appinfo>
            <fxt:exampleValues xmlns:fxt="http://freexmltoolkit.org/xml-schema-extensions">
                <fxt:example value="TRX-0815"/>
                <fxt:example value="TRX-0816"/>
            </fxt:exampleValues>
        </xs:appinfo>
    </xs:annotation>
</xs:element>
Older schemas keep working. The form that packs tag and value into the attribute alone -
<xs:appinfo source="@since 4.0.0"/>, used throughout FundsXML - is still read, and so isaltova:exampleValues. Both are rewritten into the form above the next time you save the schema from the toolkit; the generated documentation is the same either way. Analtova:exampleValuesblock is only converted once you actually change the example values.
7. Sample XML Generator
Create sample XML files based on your XSD schema. This is useful for testing, data migration, or as a starting template.
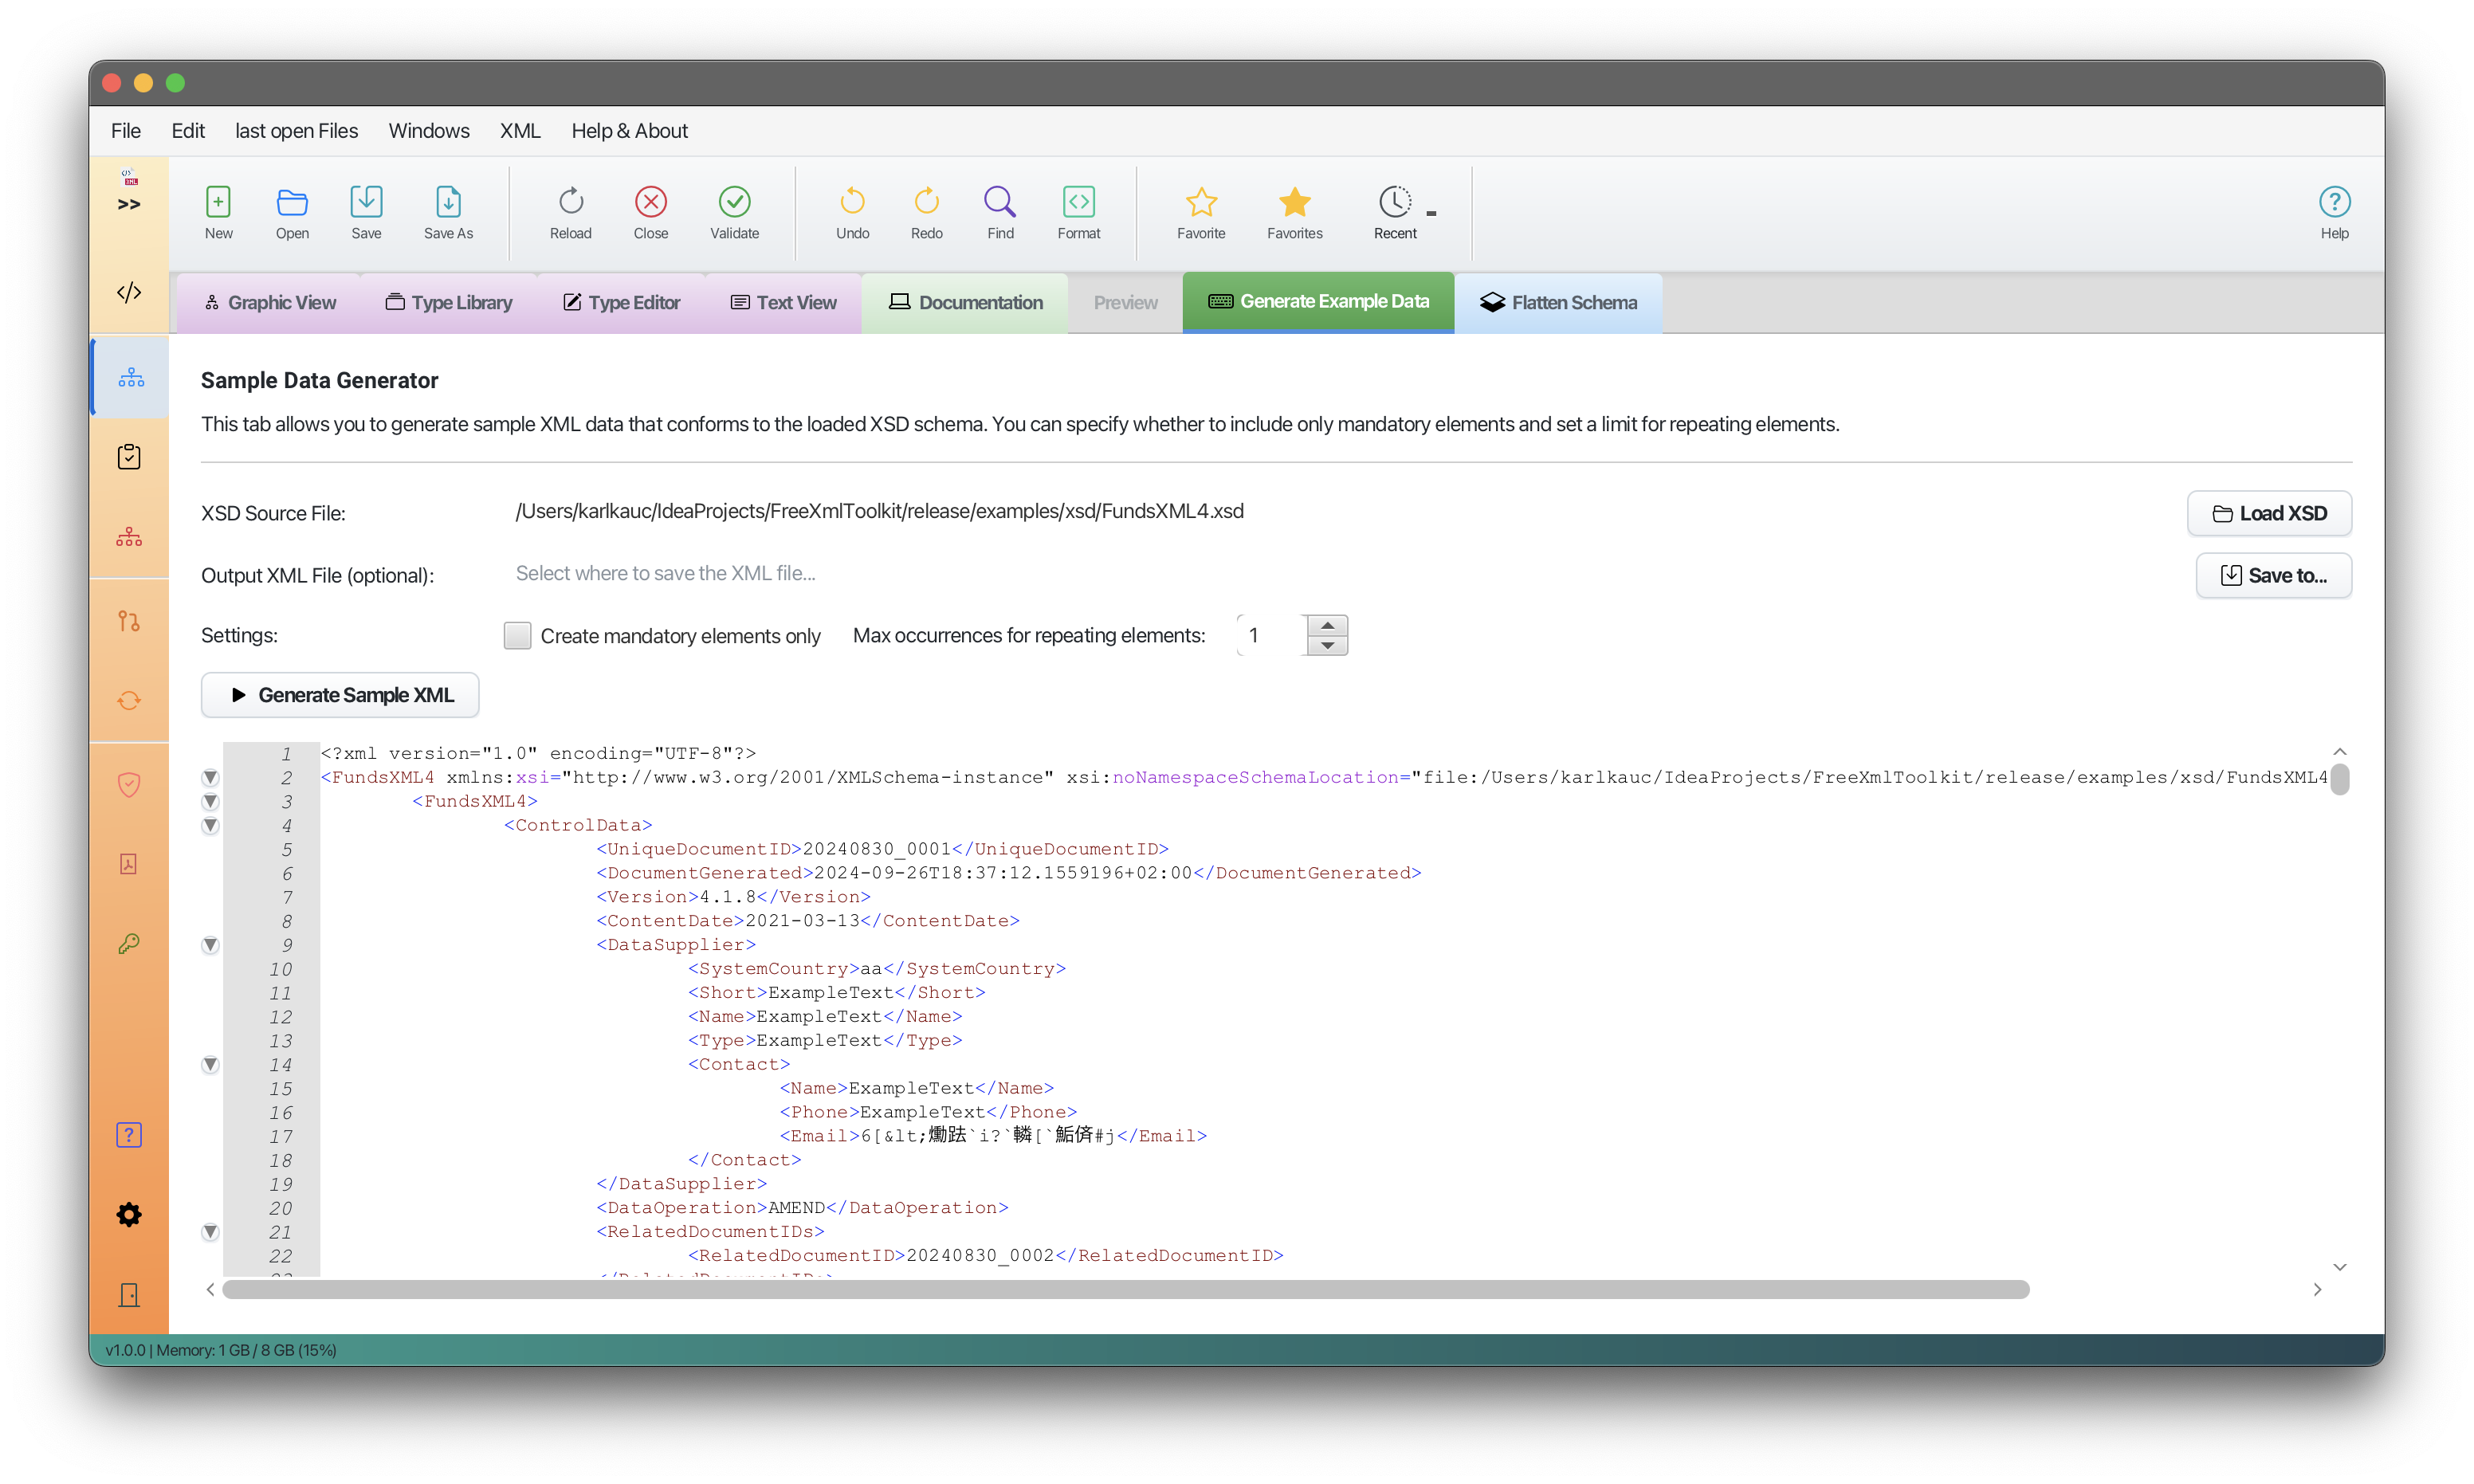 The advanced sample generator dialog with its per-XPath rules table
Unified Shell: In the Unified Shell, sample-data generation lives in the Schema panel. It offers two actions: Generate Sample XML for the basic generation described below, and Generate Sample XML (Advanced)… for the rule-based, batch-capable generation shown above.
Quick Start (Basic Generation)
For simple use cases, you can generate sample XML in seconds:
- Load your XSD file
- Open the Schema panel from the activity bar and click Generate Sample XML…
- Choose your options:
- Only mandatory elements: Include only required elements
- Max. repetitions: Limit repeating elements
- Realistic values: Honor enumerations, patterns and value ranges when inventing values
- Click Generate
- Validate the generated XML against the schema
- Save or copy the generated XML
Profiled Generation (Advanced)
For more control, you can define rules that specify exactly how each element or attribute gets its value. Open it from Generate Sample XML (Advanced)… in the Schema panel. It includes:
| Feature | Description |
|---|---|
| XPath-Based Rules | Set a generation strategy for each element or attribute by its XPath |
| 11 Strategies | Auto, Fixed Value, Omit, Empty, XSD Example, Enum Cycle, Sequence, XPath Reference, Random from List, Template, and Null |
| Auto-Fill XPaths | Automatically extract all XPaths from your schema to populate the rules table |
| Saveable Profiles | Save your generation configuration and reload it later |
| Profile Sharing | Export and import profiles to share with colleagues |
| Batch Generation | Generate multiple files at once with configurable file naming (for example, order_001.xml, order_002.xml) |
For a complete guide with step-by-step instructions and examples, see Profiled XML Generation.
Validation
The generated sample is pretty-printed like Format Document (Shift+Alt+F) and opens as a
normal editor tab (Sample.xml) that is already bound to the schema it was generated from, so
you can validate it right away:
- Click Validate (F8) - the result is Valid or a list of problems, not merely Well-formed
- Problems appear in the PROBLEMS list - click one to jump to its line
The sample's root element references the schema by file name
(xsi:noNamespaceSchemaLocation="FundsXML4.xsd", or the xsi:schemaLocation pair for a
namespaced schema) rather than by an absolute file: path, so it can be moved and shared.
Saving it for the first time into another folder rewrites the reference to a relative path
(for example ../xsd/FundsXML4.xsd), so it keeps resolving there - also in other tools.
8. XSD Flattener
Combine multiple XSD files into a single, standalone file. Useful when your schema is split across several files via <xs:include>, or when you want a minimal schema for a validation server.
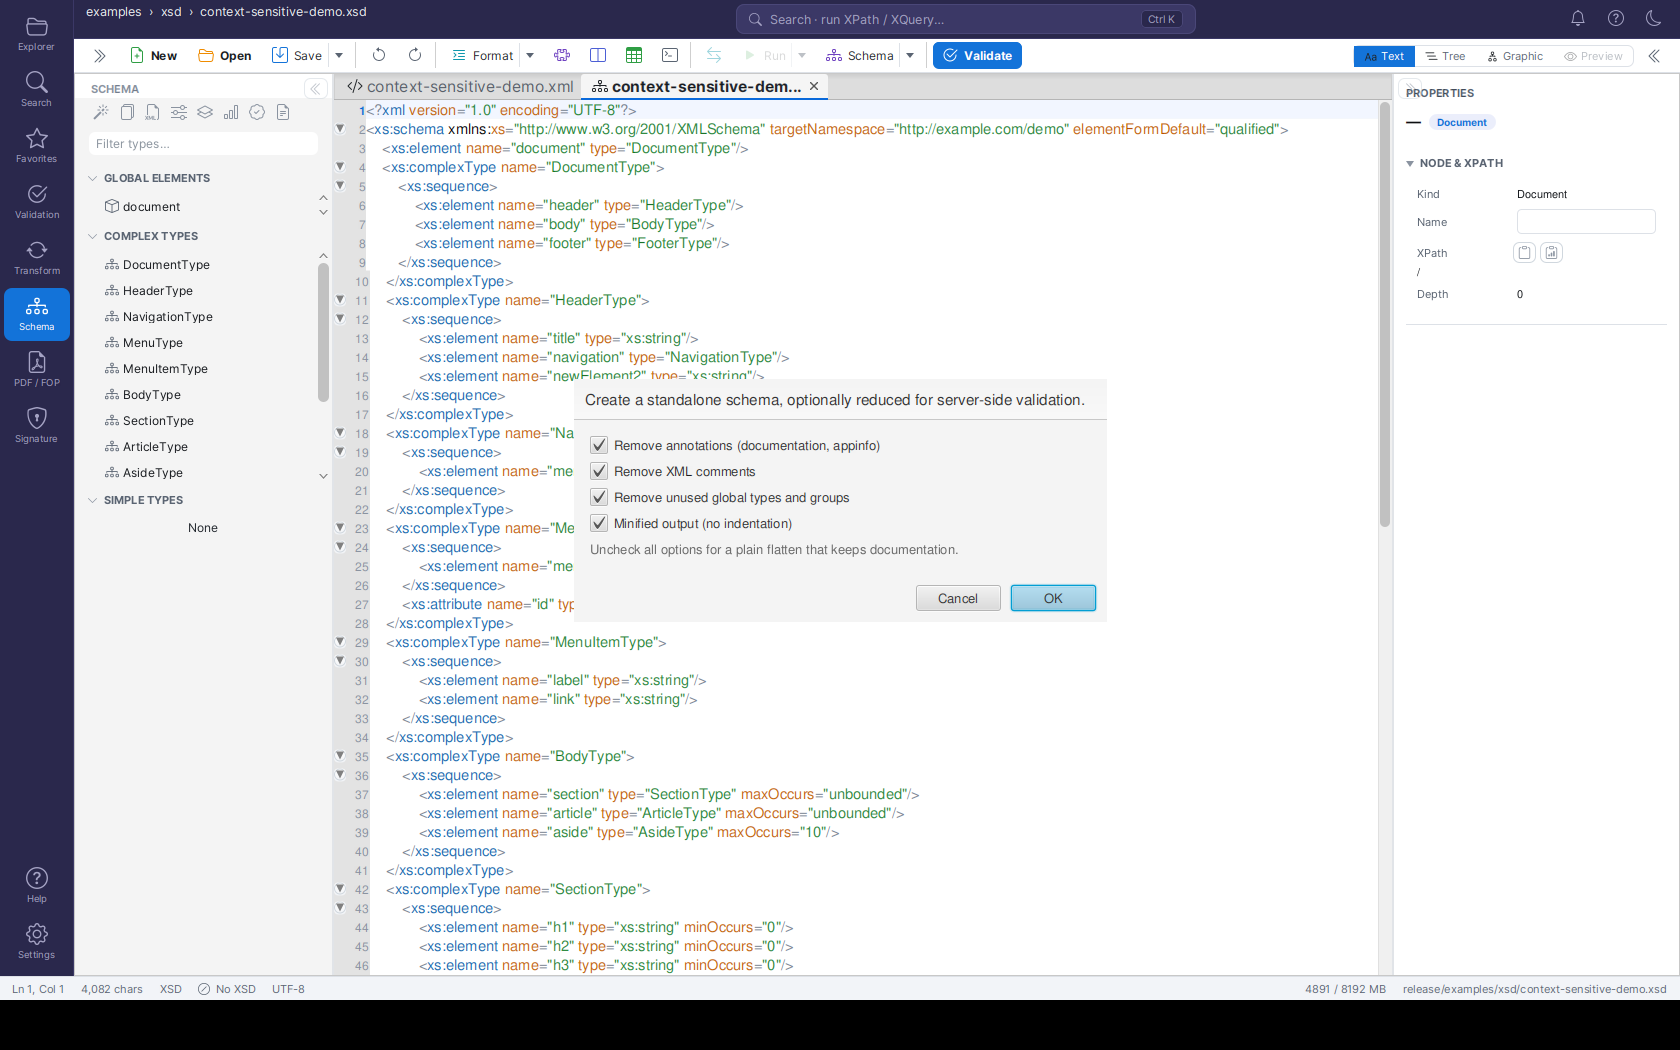 The Flatten Schema options dialog over an open schema — all reductions enabled by default
How to Use
- Open your main XSD file in the editor
- In the Schema activity's side panel, click the Flatten Schema… tool button
- The Flatten Schema options dialog opens — pick which reductions you want (see below)
- Click OK
- The flattened schema opens as a new editor tab (
Flattened.xsd), ready for you to review and save
Flatten Options
Before flattening, a dialog lets you reduce the output. The four reduction options are checked by default, which produces the smallest possible schema — ideal for deploying to a validation server:
| Option | What it does |
|---|---|
| Remove annotations (documentation, appinfo) | Strips all xs:documentation and xs:appinfo content — the human-readable descriptions a validator does not need |
| Remove XML comments | Strips all XML comments, including comments at the top of the file |
| Remove unused global types and groups | Removes global types, groups and attribute groups that are not reachable from any global element or attribute — dead weight in large schema libraries. (Skipped automatically if the schema uses xs:redefine or xs:override.) |
| Minified output (no indentation) | Collapses the whitespace between tags for the smallest file size |
Track source files (xs:appinfo) |
Off by default. Adds an fxt:sourceFile annotation to every global component that came from an included file, naming that file — see below |
Uncheck all four reduction options for a plain flatten that keeps documentation, comments and formatting — the previous behavior.
Keeping Track of Where Components Came From
Flattening merges every included file into one document, which normally loses the information
about which file a type or element originally came from. Tick Track source files to keep it:
each global element, type, group, attribute group and attribute that was pulled in from an
xs:include gets an annotation naming its origin.
<xs:complexType name="PersonType">
    <xs:annotation>
        <xs:appinfo>
            <fxt:sourceFile xmlns:fxt="http://freexmltoolkit.org/schema/flattening">types.xsd</fxt:sourceFile>
        </xs:appinfo>
    </xs:annotation>
    ...
</xs:complexType>
The markers are added after the reductions, so they survive Remove annotations — you can combine a fully reduced schema with full origin tracking. Components defined in the main file are not marked, and a stale marker from an earlier flatten is replaced rather than duplicated. The option needs a saved file: for unsaved content there is no directory to resolve includes against, so nothing is merged and nothing is marked.
The reduced schema is verified to still compile as a valid schema before it is shown, so you can deploy it with confidence.
What Happens to Includes and Imports
xs:include— Included schemas (same namespace) are merged into the output, and the resolved include directives are removed: the flattened schema is standalone. If an include cannot be resolved, its directive is kept in the output so you can see what is missing.xs:import— Imported schemas (different namespaces) are not merged; the import declarations stay untouched.
When saving schemas from the graphical editor, xs:include and xs:import declarations are preserved. The flattener only merges included content when you explicitly flatten — it does not alter your original schema structure.
When to Use
- Deploying a minimal, resource-efficient schema to a validation server
- Distributing schemas to partners
- Tools that don't support includes
- Simplifying complex schema sets
- Creating self-contained schemas
Supported XSD Features
| Category | Features |
|---|---|
| Elements | Elements, attributes, groups, attribute groups, xs:any / xs:anyAttribute |
| Types | ComplexTypes, SimpleTypes (restriction, list, union), simple/complex content with extension and restriction |
| Compositors | Sequence, Choice, All |
| Constraints | Facets: patterns, enumerations, length limits, value ranges, digits, whiteSpace, assertion / explicitTimezone (XSD 1.1) |
| References | Import, Include (resolved, also transitively); Redefine and Override are parsed but not resolved |
| XSD 1.1 | Assertions (xs:assert) are loaded, shown and analysed; xs:alternative and xs:openContent are honored by the XSD 1.1 validator but not shown in the graphical views |
| Identity | Key, KeyRef, Unique |
Keyboard Shortcuts
| Shortcut | Action |
|---|---|
Ctrl+S |
Save file |
Ctrl+Shift+S |
Save As |
Ctrl+Z |
Undo |
Ctrl+Y / Ctrl+Shift+Z |
Redo |
Ctrl+F |
Find |
Ctrl+H |
Find & Replace |
Ctrl+Shift+X |
Toggle the Query Console |
Shift+Alt+F |
Format document |
Delete |
Delete the selected node (Tree / Graphic view) |
F8 |
Validate |
Navigation
| Previous | Home | Next |
|---|---|---|
| XML Editor Features | Home | Profiled XML Generation |
All Pages: Unified Shell | XML Editor | XML Features | JSON Editor | XSD Tools | Profiled XML Generation | XSD Validation | XSLT Viewer | XSLT Developer | FOP/PDF | Signatures | IntelliSense | Schematron | FundsXML Extensions | Favorites | Templates | Tech Stack | Security | Licenses